Settings & Buttons
Adding Files
EDA Playground supports multiple files, up to a total character limit of 1,000,000. The files may be HDL source files, or text files to be used as inputs to the testbench.

To add a file, click the + sign in the testbench or design pane. Then create a new file or upload an existing file. The filename may not contain special characters.
Simulating code with multiple files
For SystemVerilog, use include statements such as the following to include the added source files in the compile:
`include "adpcm_seq_item.svh"
For VHDL, all files with the .vhd and .vhdl extensions are automatically included in the compile.
For Python, use import statements:
from design import *
To rename a file, double click the tab name. (The initial testbench and design files cannot be renamed.)
Sidebar Options
EDA Playground provides many options that can be configured for running your code.
Languages & Libraries
This section allows selection of coding languages and the available libraries for those languages.


Testbench + Design
The testbench (left editor pane) and design (right editor pane) may be written using one of these languages:
Verilog/SystemVerilog for both
VHDL for both
e for testbench, and SystemVerilog/Verilog for design
Python for testbench, and SystemVerilog/Verilog for design
Python for both
UVM / OVM (SystemVerilog)
When language is Verilog/SystemVerilog, a UVM or OVM library can be used for both the design and testbench. The following libraries are available:
UVM 1.2
UVM 1.1d
OVM 2.1.2
Other Libraries (SystemVerilog/Verilog)
When language is Verilog/SystemVerilog, other Verilog libraries can be used for both the design and testbench. These libraries may be used along with UVM/OVM. Multiple libraries may be selected at the same time. Ctrl+Click to select multiple libraries. Available libraries:
OVL
SVUnit
ClueLib
svlib
SVAUnit
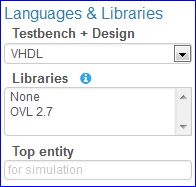
Libraries (VHDL)
When language is VHDL, the following VHDL libraries can be used for both design and testbench.
OVL
OSVVM
UVVM
Top entity (VHDL)
When language is VHDL, the top entity of the design must be specified before running a simulation.
Libraries (C++)
When language is C++/SystemC, the following libraries can be used for both design and testbench.
SystemC 2.3.1
SystemC 2.3.0
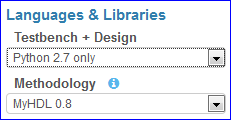
Methodology (Python + Verilog or Python only)
When testbench language is Python and design language is Verilog/SystemVerilog, the following verification environments are available:
cocotb 0.4
cocotb 0.3
cocotb 0.2
When testbench and design language is Python, the following methodologies are available:
MyHDL 0.8
Migen X
Migen
Before running synthesis on a Migen design, the Top class corresponding to the top module must be specified. The Top class is the class instantiation to use when converting the Migen design to Verilog. Some examples:
MyModule()Divisor(4)MyMemory(16, 2**12, init=list(range(20)))
Tools & Simulators
For running the code, several tools/simulators may be selected. Many simulators have additional options that may be specified. Any options needed for languages and libraries will automatically be included.
Open EPWave after run
Checking this option will open EPWave wave viewer in a new window after the simulation run completes (pop-ups must be enabled). It is available for all simulators that have a run step.

Download files after run
Checking this option will download the run directory as a ZIP file after the simulation run (pop-ups must be enabled). The simulation run does not have to be successful for the download to occur. The ZIP file will include all the code files as well as any generated files such as wave dumps, log files, etc.

YouTube video: How to download code and results from EDA Playground
Simulators
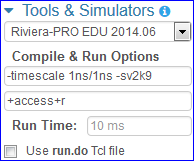
Additional command-line compile options and run options may be specified in the bottom textboxes.
(If available), the Run Time option can be used to specify the number of timesteps for the simulation to run. By default, the simulation runs forever until it hits a breakpoint or $finish.
The Use run.do Tcl file option is for using a custom run.do DO file for specifying simulation commands. To use a run.do Tcl file, check the option and add a new file called ‘run.do’.
Yosys
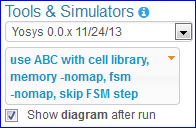
Yosis is a synthesis tool for performing logical synthesis and creating a netlist. It supports using ABC to synthesize for a sample cell library.
Yosys will only process code in the right Design pane. The code in the left Testbench pane will be ignored. UVM/OVM/Methodology/Libraries selections are also ignored.
The following synthesis options are available:
use ABC with cell library - synthesize for a demo cell library using ABC
memory -nomap - skip memory_map step
fsm -nomap - skip fsm_map step
skip FSM step
Show diagram after run - open the generated circuit diagram after synthesis flow completes (pop-ups must be enabled).
When using Yosys with Migen, the Top class must be specified, which is used to convert Migen design to Verilog.
When using Yosys with MyHDL, the Testbench pane must contain code to convert MyHDL design to a Verilog file. The Verilog file must have suffix .v, and can be named anything EXCEPT tb_* or a Verilog reserved keyword. Thus, when running Yosys on MyHDL code, the Testbench code will be run first before synthesis.
VTR
Verilog-to-Routing is a complete physical design flow that includes elaboration, logical sysnthesis, FPGA technology mapping, packing, placement, and routing. The recommended architecture file k6_frac_N10_mem32K_40nm.xml is used for the flow. In addition, route channel width is set at a high 100 to ensure no routing issues with dense designs.
VTR will only process code in the right Design pane. The code in the left Testbench pane will be ignored. UVM/OVM/Methodology/Libraries selections are also ignored. Currently, no additional options are available for VTR.
Currently, VTR cannot be used with MyHDL or Migen.
Editor Modes and Shortcuts
The editor supports the following modes:
Default
Vim
Emacs
The user may select the mode in the User Options on the user page:

Note that Vim and Emacs modes are only loose approximations of the actual bindings.
Default Mode
The default mode comes with search/replace functionality. The keybindings are:
Ctrl-F / Cmd-F - Start searching
Ctrl-G / Cmd-G - Find next
Shift-Ctrl-G / Shift-Cmd-G - Find previous
Shift-Ctrl-F / Cmd-Option-F - Replace
Shift-Ctrl-R / Shift-Cmd-Option-F - Replace all
The default mode uses the following shortcuts. Note that the shortcuts are different for PC and MAC users.
// For All
keyMap.basic = {
  "Left": "goCharLeft", "Right": "goCharRight", "Up": "goLineUp", "Down": "goLineDown",
  "End": "goLineEnd", "Home": "goLineStartSmart", "PageUp": "goPageUp", "PageDown": "goPageDown",
  "Delete": "delCharAfter", "Backspace": "delCharBefore", "Tab": "defaultTab", "Shift-Tab": "indentAuto",
  "Enter": "newlineAndIndent", "Insert": "toggleOverwrite"
};

// For PC
keyMap.pcDefault = {
  "Ctrl-A": "selectAll", "Ctrl-D": "deleteLine", "Ctrl-Z": "undo", "Shift-Ctrl-Z": "redo", "Ctrl-Y": "redo",
  "Ctrl-Home": "goDocStart", "Alt-Up": "goDocStart", "Ctrl-End": "goDocEnd", "Ctrl-Down": "goDocEnd",
  "Ctrl-Left": "goGroupLeft", "Ctrl-Right": "goGroupRight", "Alt-Left": "goLineStart", "Alt-Right": "goLineEnd",
  "Ctrl-Backspace": "delGroupBefore", "Ctrl-Delete": "delGroupAfter", "Ctrl-F": "find",
  "Ctrl-G": "findNext", "Shift-Ctrl-G": "findPrev",
  "Ctrl-[": "indentLess", "Ctrl-]": "indentMore",
  fallthrough: "basic"
};

// For MAC
keyMap.macDefault = {
  "Cmd-A": "selectAll", "Cmd-D": "deleteLine", "Cmd-Z": "undo", "Shift-Cmd-Z": "redo", "Cmd-Y": "redo",
  "Cmd-Up": "goDocStart", "Cmd-End": "goDocEnd", "Cmd-Down": "goDocEnd", "Alt-Left": "goGroupLeft",
  "Alt-Right": "goGroupRight", "Cmd-Left": "goLineStart", "Cmd-Right": "goLineEnd", "Alt-Backspace": "delGroupBefore",
  "Ctrl-Alt-Backspace": "delGroupAfter", "Alt-Delete": "delGroupAfter", "Cmd-F": "find",
  "Cmd-G": "findNext", "Shift-Cmd-G": "findPrev",
  "Cmd-[": "indentLess", "Cmd-]": "indentMore",
  fallthrough: ["basic", "emacsy"]
};
keyMap.emacsy = {
  "Ctrl-F": "goCharRight", "Ctrl-B": "goCharLeft", "Ctrl-P": "goLineUp", "Ctrl-N": "goLineDown",
  "Alt-F": "goWordRight", "Alt-B": "goWordLeft", "Ctrl-A": "goLineStart", "Ctrl-E": "goLineEnd",
  "Ctrl-V": "goPageDown", "Shift-Ctrl-V": "goPageUp", "Ctrl-D": "delCharAfter", "Ctrl-H": "delCharBefore",
  "Alt-D": "delWordAfter", "Alt-Backspace": "delWordBefore", "Ctrl-K": "killLine", "Ctrl-T": "transposeChars"
};